So one of the more popular questions in the office is “How do we record sound on these systems?”
Ever since Samsung took their Built-in audio cameras off the shelves, it’s always been an issue for our customers as to how they can record audio on their systems. We’ve always known the answer and shared it with our customers, but we’ve never had the inventory or the items to show them exactly what was necessary.
Here is the answer: Samsung’s newer DVR’s that us BNC cables come with 4 audio ports on the back using RCA type inputs. With these you have up to 4 slots for audio microphones which can be assigned to a certain camera within your settings; however, the hard part would be that a security microphone would require your to run a separate line from the DVR to your designated camera.
That answer was always given out by our customer representatives when a customer asked because it is the correct process in which one can obtain sound recording on the Samsung DVR’s. Now we can show you here what needs to be bought and how you can go about setting up your recording function.
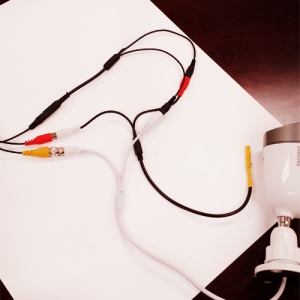
 I have here a standard powered security microphone.
As you can see the cord itself is very short. You’ll have to run additional cabling in order to utilize it. The yellow portion is your microphone, the red tip is your power input, and the white tip is your RCA input. These three things combined make your powered security microphone.
You may be asking why it is necessary to have a powered microphone. In many cases, microphone usage can vary in location. This being the case, having a powered microphone allows you to have a much more sensitive mic. Your sound may be much more detailed and crisp compared to a microphone that doesn’t require a separate power source. The microphone that you see to your left is a security specific microphone that after some testing has shown very good as far as recording quality is concerned.
The biggest worry about these microphones is that the wiring is a tad bit different. It also depends on the situation you are in at the moment as far as installation is concerned. If you’re installing your system for the first time and you’re still at the “have-not-wired” phase, you’ll be in a much simpler situation compared to those who have already done the wiring. Let me start with help for those who have already wired their cameras already.
Installing a Security microphone when having already installed cameras.
This can be an extremely daunting task for some; maybe not for others. The idea of having to run another cable is what makes this the more cumbersome of the two situations. Once you get past the wiring and getting the microphone to the spot you would like to install it, you’re in the clear. It’s extremely easy sailing from there on out, but I’m sure after having read about the additional wiring, I may have some of you feeling somewhat uncomfortable already.
 In this situation you’re going to be using 2 things. You’ll need another run of BNC cabling. You’ll also need an BNC to RCA adapter/coupler/converter (whichever term is fine as long as I’m getting my point across). You already know that a BNC cable has two female ends. These female ends can be converted into RCA plugs by using a BNC to RCA adapter. Because a BNC cable uses similar if not the same type of make as an RCA cable, you won’t find any trouble in using these adapters. Additionally, a BNC cable has power cables that are already a part of it, making it easy to run the power supply for your microphone.
The next few parts are also fairly simple. You’ll connect your security microphone to the male end of the BNC power plug and also connect the male end of the newly formed RCA plug.


The two pictures above show your the very simple connection between the two wires. Of course, the final step involves connecting everything to your DVR. The DVR has 4 labeled slots in the back ranging from 1-4. You’ll connect your RCA plug into the female end and plug in the female power plug into one of the slots you have on your splitter. There is an alternative to plugging it directly into a splitter if you do not have any more room on the splitter. I will go over this in a different section below.
Installing a Security microphone when installing your cameras for the first time.
The lack of a microphone in the cameras is not just limited to Samsung cameras. It is my belief that having a microphone port built into a camera is more of a weather-resistance liability. Why? Because normally a microphone port looks like a small hole in the camera. This whole is more or less exposed even with a roof over it. Small cracks and holes in any kind of structure is a means for water entry, dust collection, condensation, or some sort of other kind of issue. That being the case, a built-in microphone could actually mean quite a bit of trouble for many.
 Since it is a fairly similar trait shared among security cameras, there is also a BNC cable that has, not 2 ends, but 3 ends. This cable is composed of a BNC cable, power cable, and an RCA cable. This makes it extremely simple to connect a security microphone. The only reason why I recommend these to people who have yet to install their cameras is because of the fact that you don’t have to go through the process of removing previous wiring to install new wiring.
It comes in the standard lengths as a normal BNC cable would, but I’ve noticed that there aren’t too many white colored cables for some odd reason. So the one part that is a bit confusing about this is that you need some sort of power supply for the microphone since you’ll be using the other one for the camera. The answer is quite simple. This answer is also the solution I had referred to before in the previous section.
They have alternative splitters that come in two’s instead of the standard 4 or 8. Using that splitter, you’ll actually split the power cord on the BNC “triplet” cable and have two ports instead of 1. You’ll notice on the picture to the right that I have a Samsung camera plugged into the triplet cable as I normally would but have plugged the power supply for both my mic and the camera into the 2-splitter that I mentioned before.
If this method doesn’t fit your desired process, then you can always purchase a 0.5V adapter to power your microphone separately. Then you can avoid the whole 2-splitter all together and use a separate power source. I’ve tested both to work just fine so either option is more than a viable option. It’ll be purely your preference at that point.
Assigning your Microphone to your Camera
This is actually quite simple. I only have Samsung equipment to work with so I’m not quite sure if I can say it is the same for other companies, but the microphone is not a difficult setting to make.
You’ll first right click on your screen and head to the main menu. Of course if you haven’t done so in a while or if you’ve restarted your system once before, you’ll have to provide a password of some kind to get in.
Afterwards, you’re going to head to the Camera section. Upon doing so, you’ll find that you have a few columns to work with. This includes the following: CH (Channel), Video, Audio, Ch Name, SEQ-Dwell Time.
Of these settings, you’re going to change the items on the Audio list. Be sure to remember which channel you plugged your microphone into. If you have your cameras already plugged into your DVR, you’ll already know which channel holds which camera and where you’d like to hear sound from. By going to the row of your designated channel, you’ll select between an option of 1-4. These numbers mark your microphone, and you’ll know this number by looking on the back of your DVR where the RCA plug is plugged in. After you press OK, you should be all set.


Final Comments
There is one thing to note after you have finished setting your cameras. Depending on whether you’ve played around with your system prior may also dictate what you see. When plugging in the microphone and designating a microphone in the settings, you’ll notice that a speaker icon will pop up in the video window. The speaker may have a slash through it and it may not. In the case it comes up with a slash next to it, don’t worry! It doesn’t mean that your microphone isn’t working. It simply means that the speaker function is one or muted. The speaker or audio out function is a whole different story so I’ll have to cover that at a different point.
I do suggest that you do check and make sure that your microphone is working properly at the right channel after all the setup is complete. In order to do so, you’ll have to just back up a small portion of that video footage onto a thumb drive and review the footage.
Enjoy!

Hello there. I truly like your post. I like so much this security framework. It is the most recent method for security. I think security is the fundamental need of our general public and business. I welcome your exertion. Keep it up dear…!
Regard
Bestoneuk | security camera
Can I use this microphone to listen to the audio in live view?
yes you can.
Where can i buy this micro and the cable ?
Geoffrey,
Please check our website as all accessories are listed there!
http://www.soltechsecurity.com
Thank you!
Kind Regards,
Soltech Security
Hello,
I would like to know how does the speaker or audio out function work in Samsung DVR.
I connected RCA speakers to the port but there is no sound. What sounds should be listened through the speakers? Those from the cameras?
In your post, you mentioned that you will cover that at a different point.
Have you posted a new article where you explain about that?
Could you publish the link, please?
Thanks a lot.
Fernando,
We have not published a new article as of yet. But this video I found may give you insights on what you are looking for.
Thank you